Raspberry Pi Servo board, Version 3:
News:
2016-08-23 Manual NEEDS to be updated for Raspberry Pi 3. See section "Problems with Raspberry Pi 3 ?" a bit down for now!
2015-10-02 The manual is updated with instructions for Raspberry Pi 2, A+ and B+. Hints for hacking updated.
2015-01-17 The manual is updated. Odroid C1-section added, Electrical specification added,
pinout section added and Hints for hacking added.
2014-05-19 Complete SW package for current firmware available, see
Download below.
2014-04-20 Swedish post lowered shipping rates
2014-04-08 The manual is updated. How to install new firmware section added.
Image showing which servo connector is which was corrected.
2014-03-09 Got Optiboot
working on board, see Update firmware below
2013-02-10 Released manual, see below
2013-02-10 Firmware 0.2, Added support for 38400bps, that is max
2013-01-25 Software is pretty much done.
2013-01-16 Working on serial SW for version 3 HW featuring ATmega8.
2013-01-12 Got 10 PCBs for HW version 3
2013-01-01 Working on new hardware (version 3) with bigger CPU, and I2C and SPI-support.
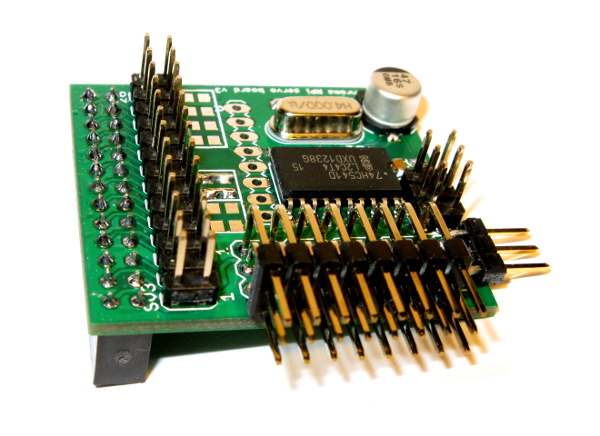
What is it?:
It's a small board that connects to a Raspberry Pi and allows you to
control up to eight RC servos (or ESCs) via the serialport in the GPIO port of the Raspberry pi. The
commands for
the serial version are simple ASCII. The 2x13 pin header on top is a pass through if you want to
connect other cards using the GPIO-port. Of course this SW will
also be open source. The serial ASCII protocol will be the same as
for the HW v2 board and SW. The output is buffred and made 5V by a
buffer IC.
Future cards/FW might be controllable through I2C and/or SPI.
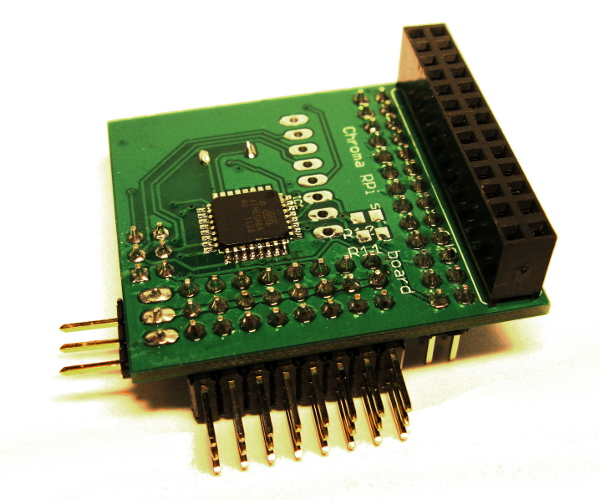
If you are into AVR-programming you can reprogram the little MCU on the
RPi Servo board and make the card do whatever you like. Maybe read 6
temperature sensors and send the values as ASCII on the serial
port?
The card also has a 8 pin connector (unmounted) that exposes 6 GPIO-pins
of the ATmega8 CPU, +3.3V and GND. With firmware version 0.2 there are
experimental support to use them as as digital output controlled via
a serial command. If you want to make your own firmware the pins
is also the ATmega8s I2C lines (2 pins) and SPI
(4 pins).
Buy a card
$12 for a complete card.
Postage to Sweden is $2, Europe $4, rest of the world
$5.
Postage to Sweden is $1, Worldwide shipping is $2
If you want to buy one and is not living in sweden you can
send $14 to paypal adent@chroma.se but please send an email
before to confirm availability!
Download
2014-05-19 Software package SW version 0.2
2015-10-02 Manual
2013-02-10 Bare C-code for version 0.2
2013-02-10 Example C-code to drive the servo board from RPi.
2013-01-16 Nothing yet!
Problems with Raspberry Pi 3 ?
NOTE FOR RASPBERRY PI 3: The Raspberry pi 3 has changed things around a
bit: ttyAMA0 now refers to the serial port that is connected to the
bluetooth. The old serial port is now called ttyS0. So if you have an
RPI3, everywhere you see "ttyAMA0" in the manual, you should read "ttyS0".
Update firmware (only boards shipped after 2014-03-09)
My experiments with optiboot seems to work very well. If a new firmware
is relased and you have a board with optiboot you can easily install
the new firmware like this:
0. Disconnect all servos/ESC's
1. Download the new firmware (or make your own) to the pi, we assume its: main.hex
2. On your pi: sudo apt-get install avrdude
3. Put a jumper on the servoboard ISP-connector pin 5 and 6 (you can borrow the powerjumper that came with
the board).
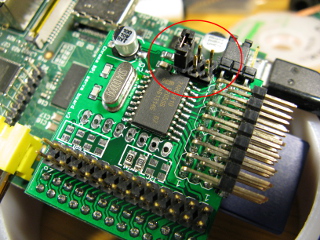
4. Now type/paste the below line on your pi:
5. avrdude -c arduino -p atmega8 -P /dev/ttyAMA0 -b 19200 -U flash:w:main.hex
6. Hit enter and quickly remove the jumper (in that order).
If it does not succeed repeat steps 3 to 6.
If you want a special features, please send me
an email!
Contact me at: mikael(at)chroma.se
home